Categories
Linux Tech

Install CentOS 8

Download the latest CentOS 8 ISO from: https://www.centos.org/download/

Define a VM and boot to installer.

The first install screen you are presented with is the language selection screen.

CentOS 8 installation – language selection screen

After selecting your language you are presented with the Installation Summary screen. At the bare minimum you will need to specify the installation destination in order to proceed.

CentOS 8 installation – installation summary screen

Click on Installation Destination

CentOS 8 installation – installation destination screen

Keep defaults and click done (unless you want to manually create partitions or enable encryption).

Optional step – enable Ethernet adapter and set hostname.

CentOS 8 installation – Network & Hostname screen

Optional step – select base environment and optional software to install.

CentOS 8 installation – Software Selection screen

Once back on the installation summary screen, click the Begin Installation button.

The installation will begin and you are shown the following screen while the install takes place in the background.

CentOS 8 installation – Configuration screen

Set Root password and create a new user if you wish.

When the installation is complete the reboot button will appear – click reboot. That’s it!

Post installation, login and run the “yum update -y” command to perform package updates.

Categories
Windows

Build a Domain Controller on Windows Server 2016

Rename the PC – Assign desired controller name.

CorpDC1 is the name we are going to use in this example.

Set static IP, Gateway and DNS values.

Example values shown above.

Install AD DS role via Server Manager.

Create a new forest.

Root domain name: demo.local used in this example.

Set functional level of the new forest and root domain and set DSRM password

Default values used.

Default paths used for AD DS database, log files, and SYSVOL.

Hit next a couple times and then the install button – your domain controller will be up and running after the required reboot.

Categories
Security Windows

Automate Updates on Windows Server 2019

On a new installation of Windows Server 2019, updates have to manually be installed by default. This includes Definition updates to Windows Defender. We are going to automate this process to keep our server always up-to-date.

Let’s start by opening the group policy editor. You can do this by entering gpedit.msc via the Run window

Run: gpedit.msc

When the Local Group Policy Editor opens, navigate to the following: Local Computer Policy => Computer Configuration => Administrative Templates => Windows Components => Windows Update

Windows Server 2019 - Local Group Policy Editor

Under Windows Update – we are going to enable and configure the following policies.

Windows Server 2019 - Windows Update Group Policies

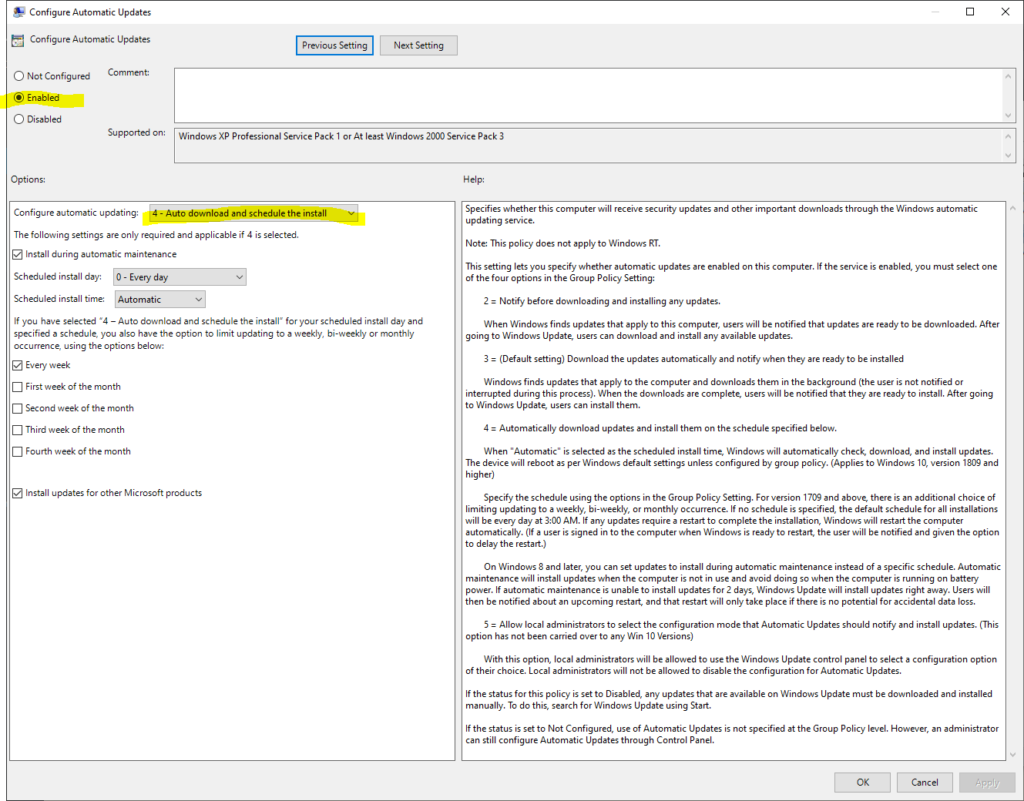
Under the Configure Automatic Updates policy there are several options. Select option 4 – Auto download and schedule the install and check the Install during automatic maintenance checkbox. You can also specify days and times of the installs.

Configure Automatic Updates policy

The next policy we are going to enable and modify is the Automatic Updates Detection Policy. This policy dictates how often the OS will check for updates.

Automatic Updates Detection Policy

The final policy we are going to enable is the Allow Automatic Updates immediate installation policy. This will allow updates that won’t interrupt Windows services or require a restart to be installed (e.g. Definition updates).

Allow Automatic Updates immediate installation

That’s it! Now your server will continuously check for updates at the frequency you specified and install the updates during the maintenance windows specified.

Categories
PowerShell Windows

How to create a Hyper-V VM via PowerShell

To create a VM in Hyper-V (or any hypervisor for that matter) we need to define a few necessary virtualized hardware components. We need to define memory (RAM), CPU(s), and a boot device. For our purposes we will use a Virtual Hard Disk as our boot and storage device.

Let’s start!

Open an elevated Windows PowerShell prompt or Powershell ISE (Run as Administrator)

Elevated PowerShell prompt

Now, we are going to create Virtual Hard Disk (VHD) using the following command. (name of the VHD, storage path, and capacity are up to you.)

New-VHD -Path "C:\VHD_TEST\VirtualHardDisk.vhdx" 60GB

Let’s define a VM…the following command creates a new Gen2 VM with 2GB of memory. In this example, I have given it a descriptive name of “Andre’s CentOS VM”

New-VM -Name "Andre's CentOS VM" -Path "C:\VM" -MemoryStartupBytes 2048MB -Generation 2

(optional ) Let’s adjust the number of processors to 2 (default: 1)

Set-VMProcessor -VMName "Andre's CentOS VM" -Count 2

(optional) Disable SecureBoot as we are planning on installing CentOS on this VM in the future.

Set-VMFirmware "Andre's CentOS VM" -EnableSecureBoot Off

(optional) We’re going to add a network adapter and attach it to a virtual switch.

Add-VMNetworkAdapter -VMName "Andre's CentOS VM" -SwitchName "Default Switch"

(optional) Let’s also add a virtual DVD drive for OS installation media.

Add-VMDvdDrive -VMName "Andre's CentOS VM" -Path "C:\ISO\CentOS-7-x86_64-Minimal-1908.iso"

Alternatively, we could create a VM with a single command using the following:

New-VM -Name "Andre's CentOS VM" -MemoryStartupBytes 2048MB -BootDevice VHD -VHDPath "C:\VHD_TEST\VirtualHardDisk.vhdx" -Path "C:\VM" -Generation 2 -Switch "Default Switch"

Categories
Linux Tech Windows

How to import ed25519 keys for use in Putty (on Windows)

Go to your ssh key dir and print the contents of the private key file (id_ed25519) in my case.

Create a new text file and paste the contents of your private key file inside and save.

Open PuTTY Key Generator

Click File → Load private key

Select all files from file extensions

Open text file containing your key

The key is imported now.

Now, you can save your private key in PuTTY’s weird format.

Click on ‘Save private key’

Categories
Linux Security Tech

How to generate and install ed25519 SSH keys on Linux (CentOS 7)

The following command generates a public and private ed25519 key pair.

ssh-keygen -t ed25519

Enter a password to protect the key if you wish then hit enter.

Private and public keys have now been generated and are stored in the location listed

Next step is to install the private key on the server

 ssh-copy-id andre@localhost

Verify fingerprint to make sure you are connecting to the intended server.

Enter your password.

This public key has now been added to the server.